

Historic stone is unforgiving. Use the wrong method, the wrong product, or too much pressure, and you won’t just fail to remove the stain. You’ll damage the stone permanently. That’s not a hypothetical. It’s a pattern we’ve seen repeatedly on projects where well-intentioned cleaning went badly wrong.
Removing stains from historic stone or cleaning historic stone buildings requires identifying what you’re dealing with before you touch it. The type of stone, the nature of the stain, the age of the staining, and the condition of the surrounding mortar all affect which approach is appropriate. What works on granite won’t necessarily work on limestone. What’s safe for a 30-year-old exterior wall may be harmful to a 200-year-old interior column.
This guide walks through how stain removal from historic stone actually works, from initial assessment through to method selection and testing.
Why Historic Stone Requires a Different Approach
Standard stone cleaning advice is written for modern, sealed, or residential stone. Historic stone is different in almost every meaningful way.
Many historic stones have never been sealed, making them more porous and more vulnerable to cleaning agents that would be harmless on sealed surfaces. The patina and aging that’s built up over decades, sometimes doing structural work, acts as a stabilizing layer that protects the stone beneath. Strip that layer, and you expose fresh stone to weathering; it’s no longer hardened to resist.
The mortar between historic stones is another consideration. Cleaning methods must be compatible with the mortar as well as the stone itself. Aggressive chemical approaches that could safely clean the stone face may degrade the mortar joints around it.
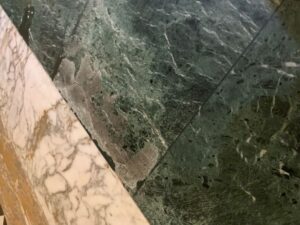
Marble eaten away by bad cleaning method at St. Matthew, Hastings-On-Hudson
The American Institute for Conservation’s guiding principle is to do no harm. In practice, this means starting with the mildest possible intervention and only escalating when a gentler approach proves insufficient.
This is the same principle that guides all of our conservation stone cleaning and preservation work.
Step 1: Assess Before You Act
Before selecting any cleaning method, you need answers to the following questions:
What type of stone is it?
Limestone and marble are sensitive to acidic cleaning agents, which cause etching and surface loss. Granite and sandstone are denser and more tolerant of stronger methods. The same cleaning solution that restores one stone can permanently dull or pit another.
What is the stain, and what caused it?
The origin of a stain determines which cleaning agent will actually address it. Organic stains respond to different treatments than oil-based stains, metal stains from copper or iron runoff, or mineral deposits like efflorescence. Using the wrong chemical for the stain type doesn’t just fail. It can set the stain deeper or introduce new discolouration.
How old is the stain?
Older stains have had more time to penetrate the stone’s pores. They typically require longer dwell times, repeat applications, or more targeted methods.
What is the overall condition of the stone?
Cleaning a structurally compromised stone can accelerate existing damage. If there are cracks, delamination, or active efflorescence, those conditions need to be addressed alongside or before any stain removal work begins.
Step 2: Select the Appropriate Stone Cleaning Method
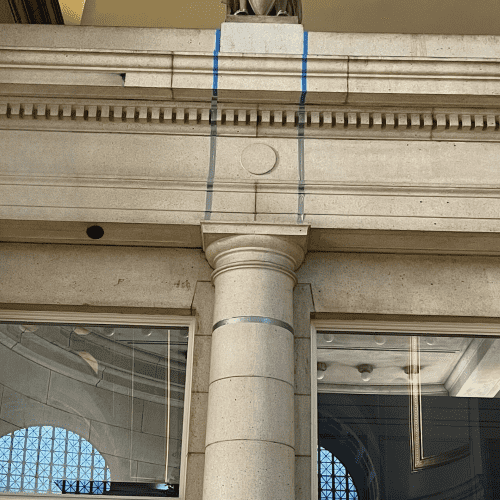

Washington Dc’s Union Station stone cleaning test showing the before and after cleaning.
Once the stone and stain have been properly assessed, the cleaning approach can be determined. Historic stone cleaning methods fall broadly into two categories: physical and chemical. Modern conservation work also uses specialist treatments that fall outside those two groups.
Physical Methods
Physical cleaning methods remove surface soiling through mechanical action rather than chemical reaction.
Water washing is the starting point for most conservation cleaning. Low-pressure water application, sometimes combined with a soft-bristle brush, is appropriate for general surface dirt and grime. High-pressure washing is rarely appropriate for historic stone and carries a real risk of surface erosion, particularly on softer stones like limestone and sandstone.
Abrasive cleaning covers a range of techniques, including micro-abrasive blasting with fine, low-hardness media. When done correctly under controlled conditions, this can be effective for removing surface deposits without damaging the stone beneath. It requires expertise and careful media selection. Used incorrectly, abrasive cleaning causes irreversible surface loss.
Latex cleaning is a low-impact method well-suited to historic conservation work. A specialized latex compound is applied to the stone surface and, once cured, peeled away. The process lifts dirt, soot, carbon deposits, and surface grime from the stone without the need for harsh chemicals or mechanical abrasion. It’s particularly effective on stone, where chemical methods carry too much risk.
Chemical Methods
Chemical cleaning uses acidic or alkaline solutions to dissolve and lift staining that physical methods can’t address. The choice of chemical depends entirely on the stain type and stone material.
Alkaline cleaners are used to break down oil-based and biological staining. They’re generally less aggressive than acid-based options and are often appropriate as a first chemical step.
Acid-based cleaners can be effective on mineral deposits and some efflorescence, but they must be used with caution. They’re not appropriate for limestone, marble, or any stone that reacts to acid. Even on more tolerant stones, concentration and contact time need to be carefully controlled.
Poultice application is one of the most reliable techniques for drawing staining out of porous historic stone. A poultice is a paste made from an absorbent material (diatomaceous earth, powdered chalk, or similar) combined with a chemical appropriate to the stain type. The paste is applied to the stained area roughly half an inch thick, sealed with plastic sheeting to prevent premature drying, and left for 24 to 48 hours. As the poultice dries, it draws the stain out of the stone and into the absorbent material.
The chemical component of the poultice varies by stain type:
- Oil-based stains: mineral spirits or acetone
- Organic stains: hydrogen peroxide (12% or higher, not standard drugstore concentration)
- Metal stains from iron or rust: a commercial rust remover formulated for stone
- Biological staining: diluted bleach or ammonia, never combined
Repeat applications are sometimes needed, particularly for older or deeper stains. Each application should be allowed to dry fully before assessment.
Frequently Asked Questions
Can I use household cleaners on historic stone?
Most household cleaning products aren’t appropriate for historic stone. Many contain acids, ammonia, or dyes that can etch, discolour, or permanently alter the surface. Neutral pH, water-based cleaners are the safest starting point. When in doubt, consult a conservator before applying anything.
What’s the difference between historic stone cleaning and standard stone cleaning?
Standard stone cleaning typically assumes a sealed, modern surface with a known product history. Historic stone is usually unsealed, may have been cleaned with various products over its lifetime, and has a patina that’s part of its character and sometimes its structural protection. Methods need to account for all of that.
How do I know if the stain is deep or surface-level?
Surface staining often responds to gentle water washing with a soft brush. If the stain persists through light washing, it’s likely penetrated the stone’s pores and will require a poultice or other targeted treatment. A conservator can assess the depth of penetration more accurately through visual inspection and, where needed, materials testing.
Does over-cleaning historic stone cause damage?
Yes. Over-cleaning can strip the surface layers of historic stone, changing its appearance and leaving it more vulnerable to moisture, weathering, and pollutant absorption. The goal is to clean to an appropriate level, not necessarily to achieve a like-new result.
How long does the poultice method take?
A single poultice application typically requires 24 to 48 hours of dwell time followed by careful removal and rinsing. Stubborn or older stains may require two or three applications with drying time between each. The full process can take several days.